If you don’t choose the right architecture for your Android project, you will have a hard time maintaining it as your codebase grows and your team expands.
This isn’t just an Android MVVM tutorial. In this article, we are going to combine MVVM (Model-View-ViewModel or sometimes stylized “the ViewModel pattern”) with Clean Architecture. We are going to see how this architecture can be used to write decoupled, testable, and maintainable code.
Why MVVM with Clean Architecture?
MVVM separates your view (i.e. Activitys and Fragments) from your business logic. MVVM is enough for small projects, but when your codebase becomes huge, your ViewModels start bloating. Separating responsibilities becomes hard.
MVVM with Clean Architecture is pretty good in such cases. It goes one step further in separating the responsibilities of your code base. It clearly abstracts the logic of the actions that can be performed in your app.
Note: You can combine Clean Architecture with the model-view-presenter (MVP) architecture as well. But since Android Architecture Components already provides a built-in ViewModel class, we are going with MVVM over MVP—no MVVM framework required!
Advantages of Using Clean Architecture
· Your code is even more easily testable than with plain MVVM.
· Your code is further decoupled (the biggest advantage.)
· The package structure is even easier to navigate.
· The project is even easier to maintain.
· Your team can add new features even more quickly.
Disadvantages of Clean Architecture
· It has a slightly steep learning curve. How all the layers work together may take some time to understand, especially if you are coming from patterns like simple MVVM or MVP.
· It adds a lot of extra classes, so it’s not ideal for low-complexity projects.
Our data flow will look like this:
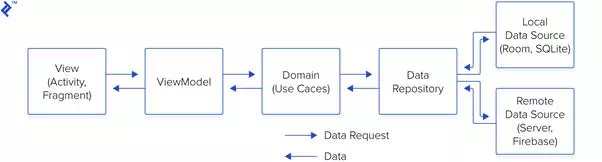
Our business logic is completely decoupled from our UI. It makes our code very easy to maintain and test.
The example we are going to see is quite simple. It allows users to create new posts and see a list of posts created by them. I’m not using any third-party library (like Dagger, RxJava, etc.) in this example for the sake of simplicity.
The Layers of MVVM with Clean Architecture
The code is divided into three separate layers:
1. Presentation Layer
2. Domain Layer
3. Data Layer
We’ll get into more detail about each layer below. For now, our resulting package structure looks like this:
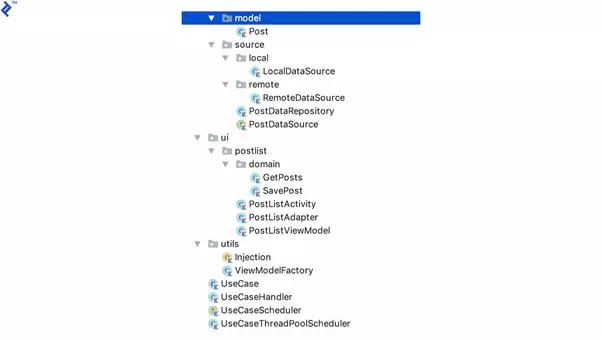
Even within the Android app architecture we’re using, there are many ways to structure your file/folder hierarchy. I like to group project files based on features. I find it neat and concise. You are free to choose whatever project structure suits you.
The Presentation Layer
This includes our Activitys, Fragments, and ViewModels. An Activity should be as dumb as possible. Never put your business logic in Activitys.
An Activity will talk to a ViewModel and a ViewModel will talk to the domain layer to perform actions. A ViewModel never talks to the data layer directly.
Here we are passing a UseCaseHandler and two UseCases to our ViewModel. We’ll get into that in more detail soon, but in this architecture, a UseCase is an action that defines how a ViewModelinteracts with the data layer.
Here’s how our Kotlin code looks:
class PostListViewModel(
valuseCaseHandler: UseCaseHandler,
valgetPosts: GetPosts,
valsavePost: SavePost): ViewModel() {
fun getAllPosts(userId: Int, callback: PostDataSource.LoadPostsCallback){
valrequestValue = GetPosts.RequestValues(userId)
useCaseHandler.execute(getPosts, requestValue,object:
UseCase.UseCaseCallback<GetPosts.ResponseValue> {overridefun onSuccess(response: GetPosts.ResponseValue){
callback.onPostsLoaded(response.posts) } overridefun onError(t: Throwable){
callback.onError(t) } }) } fun savePost(post: Post, callback: PostDataSource.SaveTaskCallback){
valrequestValues = SavePost.RequestValues(post)
useCaseHandler.execute(savePost, requestValues,object:
UseCase.UseCaseCallback<SavePost.ResponseValue> {overridefun onSuccess(response: SavePost.ResponseValue){
callback.onSaveSuccess() }overridefun onError(t: Throwable){
callback.onError(t) } }) } }The Domain Layer
The domain layer contains all the use cases of your application. In this example, we have UseCase, an abstract class. All our UseCases will extend this class.
abstractclass UseCase<Q : UseCase.RequestValues, P : UseCase.ResponseValue>{
varrequestValues: Q? =null
varuseCaseCallback: UseCaseCallback<P>? =null
internalfun run(){
executeUseCase(requestValues) } protectedabstractfun executeUseCase(requestValues: Q?)
* Data passed to a request.
*/
* Data received from a request.
*/
interface UseCaseCallback<R>{
}}And UseCaseHandler handles execution of a UseCase. We should never block the UI when we fetch data from the database or our remote server. This is the place where we decide to execute our UseCase on a background thread and receive the response on the main thread.
class UseCaseHandler(privatevalmUseCaseScheduler: UseCaseScheduler) {
useCase: UseCase<T, R>, values: T, callback: UseCase.UseCaseCallback<R>) {
useCase.requestValues = valuesuseCase.useCaseCallback = UiCallbackWrapper(callback,this)
mUseCaseScheduler.execute(Runnable { useCase.run() }) } privatefun <V : UseCase.ResponseValue> notifyResponse(response: V,
useCaseCallback: UseCase.UseCaseCallback<V>) {
mUseCaseScheduler.notifyResponse(response, useCaseCallback) } privatefun <V : UseCase.ResponseValue> notifyError(
useCaseCallback: UseCase.UseCaseCallback<V>, t: Throwable) {
mUseCaseScheduler.onError(useCaseCallback, t) } privateclass UiCallbackWrapper<V : UseCase.ResponseValue>(
privatevalmCallback: UseCase.UseCaseCallback<V>,
privatevalmUseCaseHandler: UseCaseHandler) : UseCase.UseCaseCallback<V> {
overridefun onSuccess(response: V){
mUseCaseHandler.notifyResponse(response, mCallback) } overridefun onError(t: Throwable){
mUseCaseHandler.notifyError(mCallback, t) } } companionobject{
privatevarINSTANCE: UseCaseHandler? =null
fun getInstance(): UseCaseHandler {
if(INSTANCE ==null) {
INSTANCE = UseCaseHandler(UseCaseThreadPoolScheduler()) }returnINSTANCE!!
} }}As its name implies, the GetPosts UseCase is responsible for getting all posts of a user.
class GetPosts(privatevalmDataRepository: PostDataRepository) :
UseCase<GetPosts.RequestValues, GetPosts.ResponseValue>() { protectedoverridefun executeUseCase(requestValues: GetPosts.RequestValues?){
mDataRepository.getPosts(requestValues?.userId ?:-1,object:
PostDataSource.LoadPostsCallback {overridefun onPostsLoaded(posts: List<Post>){
valresponseValue = ResponseValue(posts)
useCaseCallback?.onSuccess(responseValue) }overridefun onError(t: Throwable){
useCaseCallback?.onError(Throwable("Data not found"))
} }) }class RequestValues(valuserId:Int) : UseCase.RequestValues
class ResponseValue(valposts: List<Post>) : UseCase.ResponseValue
}The purpose of the UseCases is to be a mediator between your ViewModels and Repositorys.
Let’s say in the future you decide to add an “edit post” feature. All you have to do is add a new EditPost UseCase and all its code will be completely separate and decoupled from other UseCases. We’ve all seen it many times: New features are introduced and they inadvertently break something in preexisting code. Creating a separate UseCase helps immensely in avoiding that.
Of course, you can’t eliminate that possibility 100 percent, but you sure can minimize it. This is what separates Clean Architecture from other patterns: The code is so decoupled that you can treat every layer as a black box.
The Data Layer
This has all the repositories which the domain layer can use. This layer exposes a data source API to outside classes:
interface PostDataSource {
interface LoadPostsCallback{
} interface SaveTaskCallback{
} }PostDataRepository implements PostDataSource. It decides whether we fetch data from a local database or a remote server.
class PostDataRepository private constructor(
privatevallocalDataSource: PostDataSource,
privatevalremoteDataSource: PostDataSource): PostDataSource {
companionobject{
privatevarINSTANCE: PostDataRepository? =null
remoteDataSource: PostDataSource): PostDataRepository {
if(INSTANCE ==null) {
INSTANCE = PostDataRepository(localDataSource, remoteDataSource) }returnINSTANCE!!
} }varisCacheDirty =false
overridefun getPosts(userId: Int, callback: PostDataSource.LoadPostsCallback){
if(isCacheDirty) {
getPostsFromServer(userId, callback)}else{
localDataSource.getPosts(userId,object: PostDataSource.LoadPostsCallback {
overridefun onPostsLoaded(posts: List<Post>){
refreshCache() callback.onPostsLoaded(posts) }overridefun onError(t: Throwable){
getPostsFromServer(userId, callback) } }) } }overridefun savePost(post: Post){
localDataSource.savePost(post) remoteDataSource.savePost(post) }privatefun getPostsFromServer(userId: Int, callback: PostDataSource.LoadPostsCallback){
remoteDataSource.getPosts(userId,object: PostDataSource.LoadPostsCallback {
overridefun onPostsLoaded(posts: List<Post>){
refreshCache() refreshLocalDataSource(posts) callback.onPostsLoaded(posts) }overridefun onError(t: Throwable){
callback.onError(t) } }) }privatefun refreshLocalDataSource(posts: List<Post>){
posts.forEach { localDataSource.savePost(it) } }privatefun refreshCache(){
isCacheDirty = }}The code is mostly self-explanatory. This class has two variables, localDataSource and remoteDataSource. Their type is PostDataSource, so we don’t care how they are actually implemented under the hood.
In my personal experience, this architecture has proved to be invaluable. In one of my apps, I started with Firebase on the back end which is great for quickly building your app. I knew eventually I’d have to shift to my own server.
When I did, all I had to do was change the implementation in RemoteDataSource. I didn’t have to touch any other class even after such a huge change. That is the advantage of decoupled code. Changing any given class shouldn’t affect other parts of your code.
Some of the extra classes we have are:
interface UseCaseScheduler {
useCaseCallback: UseCase.UseCaseCallback<V>)
useCaseCallback: UseCase.UseCaseCallback<V>, t: Throwable)
} class UseCaseThreadPoolScheduler : UseCaseScheduler {
valPOOL_SIZE =2
valMAX_POOL_SIZE =4
valTIMEOUT =30
privatevalmHandler = Handler()
internalvarmThreadPoolExecutor: ThreadPoolExecutor
init { mThreadPoolExecutor = ThreadPoolExecutor(POOL_SIZE, MAX_POOL_SIZE, TIMEOUT.toLong(), TimeUnit.SECONDS, ArrayBlockingQueue(POOL_SIZE)) } overridefun execute(runnable: Runnable){
mThreadPoolExecutor.execute(runnable) } overridefun <V : UseCase.ResponseValue> notifyResponse(response: V,
useCaseCallback: UseCase.UseCaseCallback<V>) {
mHandler.post { useCaseCallback.onSuccess(response) } } overridefun <V : UseCase.ResponseValue> onError(
useCaseCallback: UseCase.UseCaseCallback<V>, t: Throwable) {
mHandler.post { useCaseCallback.onError(t) } } }UseCaseThreadPoolScheduler is responsible for executing tasks asynchronously using ThreadPoolExecuter.
class ViewModelFactory : ViewModelProvider.Factory {
overridefun <T : ViewModel> create(modelClass: Class<T>): T {
if(modelClass == PostListViewModel::class.java){
returnPostListViewModel(
Injection.provideUseCaseHandler(), Injection.provideGetPosts(), Injection.provideSavePost())asT
}throwIllegalArgumentException("unknown model class $modelClass")
} companionobject{
privatevarINSTANCE: ViewModelFactory? =null
fun getInstance(): ViewModelFactory {
if(INSTANCE ==null) {
INSTANCE = ViewModelFactory() }returnINSTANCE!!
} }}This is our ViewModelFactory. You have to create this to pass arguments in your ViewModel constructor.
Dependency Injection
I’ll explain dependency injection with an example. If you look at our PostDataRepository class, it has two dependencies, LocalDataSource and RemoteDataSource. We use the Injectionclass to provide these dependencies to the PostDataRepositoryclass.
Injecting dependency has two main advantages. One is that you get to control the instantiation of objects from a central place instead of spreading it across the whole codebase. Another is that this will help us write unit tests for PostDataRepository because now we can just pass mocked versions of LocalDataSource and RemoteDataSource to the PostDataRepository constructor instead of actual values.
object Injection {
fun providePostDataRepository(): PostDataRepository {
returnPostDataRepository.getInstance(provideLocalDataSource(), provideRemoteDataSource())
} fun provideViewModelFactory()= ViewModelFactory.getInstance()
fun provideLocalDataSource(): PostDataSource = LocalDataSource.getInstance()
fun provideRemoteDataSource(): PostDataSource = RemoteDataSource.getInstance()
fun provideGetPosts()= GetPosts(providePostDataRepository())
fun provideSavePost()= SavePost(providePostDataRepository())
fun provideUseCaseHandler()= UseCaseHandler.getInstance()
}